How to Fix a Cordless Drill Charger

The most likely – yet least opportune time – for tools to fail is in the middle of a project. My old Ryobi 12v cordless drill charger bit the dust in the middle of installing my monitor mount, but I was able to fix it without spending a dime.

The drill is less useful without charged batteries

When I popped the battery in to charge it, the light on the charger didn’t come on. It didn’t work for the other battery, or on another outlet. So, I busted out the multimeter and measured the batteries and the charger voltages. One battery was respectably close around 9.5v, but the other was completely dead at 0.00v. The charger itself was putting out 3v, which wouldn’t do much to charge a 12v battery.
I found a replacement charger on Amazon, but the reviews were overwhelmingly negative. The weak power supply was prone to dying when charging a weak battery, so my 0v battery would probably blow it immediately. Having only a single battery wasn’t desirable – they 12v batteries don’t last long anyway, and many of my projects have been temporarily halted while I charge the batteries. Maybe it’s time to buy an 18v cordless drill.

Of course, with nothing to lose, some other options are opened up. I keep the DC converters from old electronics that bite the dust, and I found one that was similarly rated at 15v. However, it was rated for 800mA whereas the original was 200mA. I want the extra juice to be able to charge batteries even if they’re very low, but I don’t want to overcharge them. I then measured the charger and found it to be almost 20v! This might have a higher risk of destroying the batteries than I had hoped, but it’s the closest converter that I had available.

The charger and power supply, along with the donor power supply

After researching batteries a bit and deciding that there the risk was acceptable, I donned safety glasses and moved to a safe area in case there was a problem. I opened up the charger case and found where the charger was connected to the circuit board. I cut those wires and clipped the donor power supply directly to the charging connectors (alligator clips are color coded incorrectly, but the connection is correct).
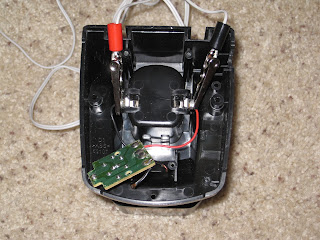
Testing the direct connection

Next, I tested with the “dead” battery to see if it could take a charge. I tested for about 5 seconds to make sure I was doing it right.

Quick Test

It showed a few hundredths of a volt! I began charging for longer periods and checking the voltage every few minutes. Eventually I got up past 12v. Actually, I could probably go way past 12v with this new more powerful charger, so I need to be very careful to not burn up the batteries.
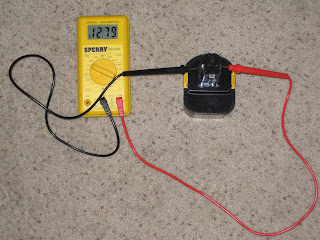
Success! Over 12v

I charged the other battery and decided that the charger is good to go. I soldered the new wires to the circuit board, and even retooled the pull-stop to prevent the cord from being pulled out and ripping out of the circuit board.

New wires soldered to the circuit board
Reassembled with the pull protector in place
Reassembled – bottom view
Reassembled – top view

Now, observe the completed product – the charging light comes on again!

Charging!

The bad news is that I have to measure the batteries with a voltmeter if I charge for more than 5 minutes. The good news is that recharges happen much more quickly, and I didn’t have to spend a dime to fix my old drill.

BTW a shorter version of this is available as an Instructable here.

Ergonomics on the Cheap

I don’t know why I waited so long to look into the ergonomics of my home office (perhaps is the cheesiness of the ergonomics warnings at work), but when I started paying attention I decided that I needed immediate action.

Part 1: The Chair

I’ve never purchased an expensive office chair, so every couple of years my chair is in poor shape and needs to be replaced. A quality chair might last longer and be worth repairing, but it’s hard to make it past the sticker price. All the same, I recommend checking out a dedicated office chair store to make the comparison, at least to know what’s out there.

So, after owning my current office chair for a few years, I realized that it has always been awful for my posture. The pan (the part you sit on) was way too long. Because of that, I could never sit with my feet on the ground and my back against the back of the chair at the same time. That meant my options include sitting with my feet on the ground but my back curved to reach the back, or to sit with my back on the back of the chair and my feet in some other position.

I recently removed the armrests to prevent me from leaning on my elbows as much, but the seat depth was still a problem. So, on a trip to the big-box office store, I happened to find a chair that felt comfortable. It was even cheaper on their web site, so I went for it. After a few days to let the factory-fresh chemical smell dissipate, I moved it into my office. So far, it has been comfortable, and I’m learning to sit with my back straight again.

The old chair on the left has a much larger seat. The armrests have been removed.

Price for new chair online: $99

Part 2: The Monitor

When I purchased my new 24″ flat panel monitor, I needed a new arrangement. My old monitor had an adjustable height stand, but the new one did not. Even worse, the new one wobbles when I hammer on the keyboard. Time to mount to something more stable!

The new monitor with the provided stand


Obviously the larger monitor has a potential to make the office more comfortable, as I can place it a bit further from me and still see well. This one jumped out at me when I was looking for 22″ monitors, and I was excited to get it since it has the same vertical size as the 19″ 4:3 monitor that it was replacing. This one is very inexpensive for a 24″ monitor, and mine has been performing well and has no dead pixels.

I’ve had great luck with monoprice.com for mounts, cables, and other things that seems to have outrageous markups elsewhere. I selected one that had 3-way adjustable arms, and should be installing it soon. My hope is that the mutli-part swinging arm will let me adjust the monitor to the optimal distance from me. Given that my desk is 29″ deep, there is a minimum distance between myself and the wall.

Monitor mounted on the swing arm assembly

Price for monitor wall mount: under $30.

I’ll post more details and pictures of the mount installation soon.

Part 3: The Desk

Knowing the right height for everything else, it’s time for the desk. My work desk is 29.375″, while my home desk is 28.5″. Neither one seem right for my chair height – I’d prefer the desk be a few inches shorter – somewhere closer to 26″ or 27″.

Desks are commonly available between 28″ and 30″, so I’m somewhat out of luck there. I looked at adjustable desks and tables, but they are generally over $1000, most likely because big companies buy them to avoid work strain lawsuits. Cheaper alternatives such as adjustable height folding tables get awful reviews about slamming down to the lowest height setting – hardly desirable given that I will use this for my daily work and may put things such as computer peripherals and books on the table.

My plan is to take the dremel to my table and remove 2″ of the legs. If successful, that will give me a 26.5″ height. I’m not very worried about the table, as it’s a 72″w x 29″d x 28.5″h folding table and hardly an heirloom. However, if I can fix it for just a few hours of my time, I won’t have to shell out a lot of money for a desk I only like a little.

The table leg – lower part is straight and can be shortened

Expected price to modify desk: $0

Conclusion

With just a few hours of my time and less than $130, I upgraded my home office to be much more comfortable.

More posts coming soon with details of the monitor mount and the table leg modifications.

Update:
Monitor Mount
Table Modification

Mounting a Glass Cable Shelf for a Projector

It took me several years to get around to mounting my projector properly, because I wanted to make it perfect. Also, I was hesitant to go into the attic to drop the mount from the ceiling. I went from using a TV as a stand (it’s hilarious to see people puzzle out why the couch was facing *away* from the TV) to using a cheap shelf as a stand. The problem was that the projector needed to be higher, and I wanted to free up the space below for storing other things.

Before – the projector sat on a cheap standing shelf

I planned to drop a mount (professional or home-made) from the ceiling for years but procrastinated because it would be a lot of work and I wasn’t even sure there was structural support at the top of the arch.

By the way, there’s a lot of support over at avsforum.com for choosing and setting up projectors, as well as selecting or even building your own mounts. Search around there.

I also don’t like the look of L-bracket shelves. They look cheap. I was frustrated at the lack of good options, but a co-worker finally convinced me to look into a suspended shelf, and that’s exactly what I needed. That also provided the push to actually start this project, which is coincidentally the most important part.

Cost was a factor, but finding a suspended shelf deep enough for the projector was the biggest hurdle. I finally figured it out – buy the cables and the shelf separately. There are lots of options for “cable shelf brackets” but I’ve ordered from here before (and this was one of the cheapest options) stacksandstacks.com/cable-shelf-brackets.

So, to get this going I needed measurements:

  • Width of the projector, and of the opening the shelf was going into
  • Depth of the projector, including space for cables
  • Weight of the projector (minimal – under 8lbs)
  • Optimal height for the projector

I found that I needed about 15″ of depth to give room for the cables, which fit perfectly within the 16″ maximum depth of the shelf kit. You can go any width, so I went with 22″ to leave room for the projector between the cables, and a few inches on the sides. I put the height exactly where I would have put the mount from the ceiling, so that the top of the image is near the ceiling and the projector pointed straight ahead without an angle adjustment.

The expensive part was the glass. You could do wood with the kit but I like the look of glass. I needed something deeper than most pre-made glass shelves, so I got this and got a custom glass piece cut. That came out just over $50 for the 15″ by 22″ cut since I got 1/2″ glass. I suggest calling them first and getting quotes (and maybe even seeing if they sell the cable kit too). I think the spacers provided with the cable package would make 3/8″ glass fit snugly in the brackets.

If you found a different kit that handled 3/16″, you’d find places online that would ship the glass. With the 3/8″ and 1/2″ sizes the weight makes the shipping cost prohibitive and you are best off buying local. I researched the load that each thickness could carry with the width of the support cables, and all of them could handle well over the weight of the projector.

Installation was pretty simple with a drill and screwdriver (plus pencil and measuring tape of course).

The freshly installed glass shelf

And here’s the shelf with the projector (it looks cleaner than it should, since the cables and entertainment center aren’t in there yet).

The initial placement – success!

BTW that’s a Panasonic PT-AE700U projector. I bought it because the lens allows zoom from 1.0 to 1.2, which gave me the range needed to make it not be far too large (and spread thin) on the wall 17 feet away. I swear that projectors are designed for people in apartments or tiny homes.

Soon after I installed the shelf, I put an entertainment center to fill the space below which helped with storage quite a bit.  The cables are fairly inconspicuous – I cable tied them together into a single cord that goes over the side and behind the entertainment center below.

This project wasn’t really that difficult once I was on the right path.

Camera Repair – No Success

I learned that one thing I’m not good at is repairing modern electronics as compact and as complicated as a digital camera.

I could probably handle swapping out the LCD for an equivalent one (but beware that each model uses a slightly different one, even in the same line from the same manufacturer). Unfortunately, my most recent two problems involved the lens. The one that went into the pool a few years ago doesn’t count as a repair candidate (although see my post on waterproof containers here for how to keep your camera safe).

On many (if not most) digital cameras, the lens automatically extends when you turn it on. If that lens gets jammed, the camera is very unhappy.

First repair attempt

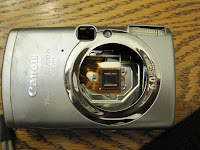
A while ago my Canon SD700IS somehow managed to open itself in the camera case, causing it to jam. When powering it on or off, it would try to open or close the lens, but give up after a few moments stating “Lens error, restart camera”. Not too helpful, as restarting repeats the process. I found information online, and thought I could disassemble it and repair the physical problem with the lens. It did NOT go so well. After many steps unwrapping this complicated beast, I realized that I would never get it back together. The lens mechanism was at the very center of the camera, and I couldn’t dissasemble it to fix it. So much for that one.

Here’s an “after” picture. I must have forgotten a piece when reassembling…

The good news is that I salvaged a few micro-screws to repair a Kodak camera that was falling apart with the panels falling off. I also had some neat parts to inspect and play with – reminds me of when I was a kid and dissasembled things (permanently) to see how they worked. Not very practical though.

This seems familiar…

The next problem camera was with the newest camera, the SD780IS. It’s a fantastic camera – compact, very quick to take pictures, very high resolution (photo and video). Everything went great, until a gust of wind blew it over from where it was perched for a timed photo. It landed on the extended lens mechanism… and I got the same lens message. Deja Vu from the first camera. Frustrating, because it won’t let you use it as a media server if the lens doesn’t work (the camera can connect to a TV, even with an HDMI cable, to show pictures and video).

Knowing the low chances of me successfully fixing it, I sent that camera in to Canon. The online repair form quoted zero dollars to fix it (after I selected what was wrong). Worth a shot even if they really don’t think the warranty covers it, as I’d like to have that camera working again. A few days later I got the notice that they received the camera. The revised estimate was $129.88. What? That’s almost the price of a new one (curently $168 on Amazon). For an extra $40, I’d prefer having a new one – with new cables, battery, etc. I think they’re trying to be clear – they don’t want to see these things again after they leave the factory. They’re disposable, and it’s time to buy a new one.

Well yes, I’m going to buy the same one again. It was a pretty sweet little camera, and performs so much better than my SD1200IS (which is still great, except by comparison). I’ve been checking around, and I don’t ususally find it cheaper than on Amazon.  Check here for the latest price on the SD780IS.

It’s sleek, fast, and will soon be mine again.

In summary, while there are thousands of pages with info on fixing various camera models, it might be a better investment to just buy a new one. Cameras are a tool, and tools get damaged when you use them. Better than having a tool in perfect condition because you never used it for the purpose you bought it for, right?

Keeping Your Valuables Dry in the Water – Dry Bags

You may have wondered, “How do you keep stuff dry at the beach/pool/river/lake?”

A waterproof container (a.k.a. waterproof box or dry bag) is an excellent choice, so I’m going to describe the basic types with a few features that will help you decide.

There are a few different options depending on your needs. I use a few of them.

  • Hard cases – latch them shut, and they wont’ get crushed or wet
  • Roll-down dry bags – these range in size and durability, but are rather convenient for larger items
  • Zip-shut bags – these zip shut like sandwich bags but are actually waterproof
  • Latch-shut bags – these may have a quicker access, but are still flexible

Some options that may not be as good

  • Sandwich bags – they seem waterproof but tend not to be. If you’re in a pinch, put one bag inside of another and it will have a better chance. Don’t press your luck, though.

I think having some method of keeping your keys (particularly key fobs), cash, and camera dry are rather important. After enjoying time around the water you still want to drive home and enjoy pictures you took, right?

Hard Cases
I haven’t bought one of these, but the Otter Box products look excellent. Waterproof and crush proof. I’ve seen some competing brands, but the Pelican case I saw in the store, while cheaper, appeared to not offer the same water proof feature – it said something about water resistant that made me shy away from it.

Roll-down dry bags
These dry bags roll down from the top and then clip together to hold the water out and be easily tied down or hauled around.
I use several – my Seal Line roll-down Dry Bag (see here)is very durable, and I use it to store my permanent emergency kit – compact and lightweight, it is waterproof so it will be safe in an emergency! There’s also a window so you can see the contents.

I also have an ultra-compact Sea to Summit Ultra-Sil Dry Sack (see here). It’s so compact it folds down to a size you could fit in your pocket, but is still waterproof. I use this for larger items that I want to make waterproof for a while and jam it in a bag or secure it in a boat.


Zip-shut dry bags
The simplest of the options, I use these the most frequently. The primary reason is that they are really small, and are perfect for what I need most – storing cash, credit cards, and car keys. I was excited when I found these, as they are quite like sandwich bags but actually waterproof! The aLokSak bags come in various sizes, and the smallest is perfect for ID and cash (which folds completely flat) and fits in my board shorts. I also use it for car keys so I don’t leave anything critical on the beach – I take this into the surf and the river with no problems. While the plastic stretches pretty well and mine have held up to repeated key jabs, be careful not to puncture your bag with your keys or other sharp objects.

Latch-shut dry bags
I’m sure there are more types of these, but two have caught my eye: neck pouch (for your keys when you don’t have pockets in the water) and camera bags. I bought the latter, and got some great results with snorkeling (much better than the disposable camera, but it made me a little more nervous because I didn’t want to smash it against the rocks). I was using a subcompact camera – my Canon SD 1200 IS is a good camera, but Canon has newer models out now.

I use this camera dry bag by Kwik Tek, the Dry Pak Camera Case. It works great, as long as you position it correctly (buttons on the bottom so you can reach them, strap not in front of the lens) and you leave air in the bag so the lens can extend. If you remove the air, your lens will bounce off of the bag and could get damaged – be careful! The thumb latches lock the bag shut and make it easy to add/remove items (except that the opening and bag are small, which makes it difficult to reposition or remove the camera when you’re out at the water). This also would have been great to bring on a recent hike that had heavy rain, but I forgot it.

The pictures look good, and this option was better for me than the other options such as hard cases (expensive) and shaped bags (generic shape meant poor placement and obstructed lens). Unless the case is meant for ONLY your model of camera, the fit won’t be perfect.

Other notes
Obviously, you may have other electronics such as GPS, an iPod or other MP3 player, or a mobile phone (smart phones are quite expensive!) that you wish to keep safe. They make waterproof containers in all sorts of sizes, and have many specialized products. These are just the basic types!

Disclaimer – I have only used these products in rain and light submersion – never more than 5 feet underwater. Scuba divers should do more research (although I suspect that hard cases will fare better).

Summary
I own several dry bags for various purposes. I think everyone who is cautious (but still enjoys the outdoors) should own a dry bag/case of one variety or another. While many are comfortable leaving their valuables alone on the beach, I feel better having my car keys with me. Peace of mind is valuable. I enjoy being prepared in case I need to make something waterproof while I’m on an adventure – some things are hard to improvise when you’re out and about!

Have fun on the beach, at the river, around the pool, or on the lake. And now, don’t worry about getting your valuables wet!